Authentication
By default, authentication is not enabled, however there are some features that are not available unless users login such as watching alerts.
Alerta supports six main authentication strategies:
OAuth2 (Note: only used by GitHub)
The OpenID Connect authentication strategy can be used to integrate with any OIDC compliant auth provider however Alerta has specific implementations for some auth providers to simplify the integration:
Alerta also supports two “machine-to-machine” authentication strategies:
To enforce authentication set AUTH_REQUIRED to True and set the
SECRET_KEY to some random string in the alertad.conf server
configuration settings file:
AUTH_REQUIRED = True
SECRET_KEY = 'ZWU2YTU0Zjg2MDkyY2RmYmRlNDM4MjYzNWQzMWMxYzQK'
Note
Ensure that the SECRET_KEY that is used to encode tokens
and API keys is a unique, randomly generated sequence of ASCII
characters. The following command generates a suitable 32-character
random string on Linux:
$ LC_CTYPE=C tr -dc A-Za-z0-9_\!\@\#\$\%\^\&\*\(\)-+= < /dev/urandom | head -c 32 && echo
or Mac OSX:
$ date | md5 | base64
Basic Auth
Basic Auth (built-in)
The most straight-forward authentication strategy to implement of the
four is HTTP Basic Authentication provided by the Alerta API
because there is no additional configuration required of the Alerta
server to use it other than setting AUTH_REQUIRED to True.
Note
HTTP Basic Auth does not provide any encryption of the username or password so it is strongly advised to only use Basic Auth over HTTPS.
Example
AUTH_REQUIRED = True
SECRET_KEY = 'something-secret'
AUTH_PROVIDER = 'basic'
SIGNUP_ENABLED = True
ALLOWED_EMAIL_DOMAINS = ['example.com']
Users sign up via the web UI or using the CLI:
$ alerta signup --name "Joe Bloggs" --email joe@example.com --password secret
Then login to receive a JWT token:
$ alerta login --username joe@example.com --password secret
Basic Auth using LDAP
LDAP can be used as the Basic Auth provider to authenticate users
if desired by setting the AUTH_PROVIDER to ldap.
It requires the installation of an additional Python package called “python-ldap” and can be installed using:
$ pip install python-ldap
Important
If the Alerta API is installed in a Python virtual
environment ensure that the python-ldap package is installed
into the same environment otherwise it won’t be auto-detected.
The configuration settings for LDAP authentication include the LDAP server URL and a map of LDAP domains to search filters which means that multiple LDAP domains can be supported.
Example
Example using LDAP_DOMAINS (simple bind)
AUTH_PROVIDER = 'ldap'
LDAP_URL = 'ldap://ldap.example.com:389'
LDAP_DOMAINS = {
    'example.com': 'uid=%s,ou=users,dc=example,dc=com'
}
Example using LDAP search (bind + search)
AUTH_PROVIDER = 'ldap'
LDAP_URL = 'ldaps://ldap.example.com:636'
LDAP_BIND_USERNAME = 'cn=readonly,dc=example,dc=com'
LDAP_BIND_PASSWORD = 'readonly-password'
LDAP_USER_BASEDN = 'ou=users,dc=example,dc=com'
LDAP_USER_FILTER = '(uid={username})'
LDAP_GROUP_BASEDN = 'ou=groups,dc=example,dc=com'
LDAP_GROUP_FILTER = '(&(member={userdn})(objectClass=groupOfNames))'
LDAP_GROUP_NAME_ATTR = 'cn'
LDAP_DEFAULT_DOMAIN = 'example.com'
ALLOWED_LDAP_GROUPS = ['alerta-users', 'alerta-admins']
Note
The LDAP_GROUP_FILTER supports {username}, {userdn}
and {email} placeholders for group membership lookups.
A typical user called user1, for the example above, would login
using an email address of user1@my-domain.com even if that
email address doesn’t actually exist.
You can fetch ldap groups dynamically from LDAP server and use them as customer
name by using LDAP_DOMAINS_GROUP configuration. Either of {username},
{userdn} or {email} can be used for the same.
All users are initially assigned the “user” role by default.
Note
User sign-up, email verfication and password reset through the Alerta web UI or CLI is not supported. Self-service user management needs to be handled by the LDAP authentication provider.
OpenID Connect
# OpenID Connect
OIDC_ISSUER_URL = None
OIDC_AUTH_URL = None
OIDC_LOGOUT_URL = None
OIDC_VERIFY_TOKEN = False
OIDC_ROLE_CLAIM = OIDC_CUSTOM_CLAIM = 'roles' # JWT claim name whose value is used in role mapping
OIDC_GROUP_CLAIM = 'groups' # JWT claim name whose value is used in customer mapping
ALLOWED_OIDC_ROLES = ALLOWED_GITLAB_GROUPS or ALLOWED_KEYCLOAK_ROLES or ['*']
SAML 2.0
To use SAML as the authentication provider for Alerta, install PySAML2 on the Alerta server and follow the configuration steps below.
$ pip install PySAML2
Generate private/public key pair:
$ openssl req -utf8 -new -x509 -days 3652 -nodes -out "alerta.cert" -keyout "alerta.key"
Note
This key pair is not related to HTTPS.
Configure pysaml2:
Bare-minimum config example:
AUTH_PROVIDER = 'saml2'
SAML2_CONFIG = {
    'metadata': {
        'local': ['/path/to/federationmetadata.xml']
    },
    'key_file': '/path/to/alerta.key',
    'cert_file': '/path/to/alerta.cert'
}
metadataIdP metadata (refer to saml2 documentation for possible ways of specifying it)
key_file,cert_filepath to aforementioned keys
Refer to pysaml2 documentation and source code if you need additional options:
Note: entityid and service provider endpoints are configured by default based on your BASE_URL value which is mandatory if you use SAML (see General Settings)
ALLOWED_SAML2_GROUPS
To restrict access to users who are members of particular group use:
ALLOWED_SAML2_GROUPS = ['alerta_ro', 'alerta_rw']
Note
Ensure that pysaml2 authn response identity object contains groups
attribute. You can do this by writing proper attribute map which will
convert your IdP-specific attribute name to groups.
Example:
MAP = {
    ...
    'fro': {
        ...
        'http://schemas.xmlsoap.org/claims/group': 'groups',
        ...
    },
    'to': {
        ...
        'groups': 'http://schemas.xmlsoap.org/claims/group',
        ...
    }
}
See pysaml2 attribute-map-dir documentation.
The attribute-map-dir can be specified in the SAML2_CONFIG.
SAML2_USER_NAME_FORMAT
The username format can be customized using the SAML2_USER_NAME_FORMAT
setting. It is a python string template which is used to generate user’s name
based on attributes (make sure that attribute-map-dir
is properly configured in case default does not fit).
Default is '{givenName} {surname}'.
CORS_ORIGINS
You also need to add your IdP origin to CORS headers:
CORS_ORIGINS = [
    ...
    'https://sso.example.com',
    ...
]
Add trusted Service Provider to your Identity Provider
Your metadata url is: {BASE_URL}/auth/saml/metadata.xml, pass it to your IdP administrator.
# SAML 2.0
SAML2_ENTITY_ID = None
SAML2_METADATA_URL = None
SAML2_USER_NAME_FORMAT = '{givenName} {surname}'
SAML2_EMAIL_ATTRIBUTE = 'emailAddress'
SAML2_CONFIG = {} # type: Dict[str, Any]
ALLOWED_SAML2_GROUPS = ['*']
GitHub OAuth2
To use GitHub as the OAuth2 provider for Alerta, login to GitHub and go to Settings -> Applications -> Register New Application.
Application Name: Alerta
Homepage URL: http://alerta.io
Application description (optional): Guardian Alerta monitoring system
Authorization callback URL: http://alerta.example.com
Note
The Authorization callback URL is the most important setting and it is nothing more than the URL domain (ie. without any path) where the alerta Web UI is being hosted.
Click Register Application and take note of the Client ID and Client
Secret. Then configuration settings for alerta server are as follows:
AUTH_PROVIDER = 'github'
OAUTH2_CLIENT_ID = 'f7b0c15e2b722e0e38f4'
OAUTH2_CLIENT_SECRET = '7aa9094369b72937910badab0424dc7393x8mpl3'
To restrict access to users who are members of particular GitHub organisations use:
ALLOWED_GITHUB_ORGS = ['example', 'mycompany']
Note
ALLOWED_GITHUB_ORGS can be an asterisk (*) to force login
but not restrict who can login.
Important
To revoke access of your instance of alerta to your GitHub user info at any time go to Settings -> Applications -> Authorized applications, find alerta in the list of applications and click the Revoke button.
OIDC Providers
OpenID Connect authentication is provided by Google `OAuth2`_, GitLab OAuth 2.0 or Keycloak OAuth 2.0 and configuration is more involved than the Basic Auth setup.
Note
If Alerta is deployed to a publicly accessible web server it is important to configure the OAuth2 settings correctly to ensure that only authorised users can access and modify your alerts.
Ensure AUTH_REQUIRED and SECRET_KEY are set and that the
AUTH_PROVIDER setting is set to the correct provider.
Then follow the steps below for the chosen OAuth provider to create an
OAuth client ID and client secret. The client ID and client secret
will need to be added to the alertad.conf file for the Alerta server.
Azure Active Directory
To use Azure Active Directory (now known as Microsoft identity platform (v2.0)) as the OpenID Connect authentication provider for Alerta follow the steps below.
- Login to Azure portal
Navigate to “Azure Active Directory” service page
From the “Manage” sidebar choose “App registrations”
- Click the button that says “New registration”
Fill in the “Register an application” form for your environment:
Name: Alerta AD
Supported Account Types: Multitenant and Personal (common)
Redirect URI: (web) https://alerta.example.com
… and click the “Register” button.
Note
The
AZURE_TENANTsetting will vary depending on what “Supported Account Type” is chosen. It will be either “common”, “organizations”, “consumers” or a tenant ID. To check which account type click the “Endpoints” button on the “Overview” page and check the “OpenID Connect metadata document” URL.Example of OpenID Connect metadata URL for “organizations”
https://login.microsoftonline.com/organizations/v2.0/.well-known/openid-configuration
Copy the App registration details for client ID, for example:
Application (client) ID:
3aab3fa8-cb9b-457f-8283-811d1ebd4975
From the “Manage” sidebar again choose “Certificates & secrets”
Click the “New client secret” button
Add description “Alerta Web UI” and choose an expiry time
Copy the client secret, for example:
jj2cw7~nc1.55l3.UAy8C3O9Ng-.~GYWYpAdd the above details to the Alerta server configuration file, like so:
AZURE_TENANT = 'common'
OAUTH2_CLIENT_ID = '3aab3fa8-cb9b-457f-8283-811d1ebd4975'
OAUTH2_CLIENT_SECRET = 'jj2cw7~nc1.55l3.UAy8C3O9Ng-.~GYWYp'
Amazon Cognito
To use Amazon Cognito as the OAuth2 provider for Alerta, set up a User Pool and App Client in the AWS Console:
Create a Cognito User Pool (or use an existing one) and note the User Pool ID (e.g.
us-east-1_aBcDeFgHi).Under “App integration”, create an App Client for Alerta:
App client name:
AlertaCallback URL:
http://alerta.example.comAllowed OAuth Flows: Authorization code grant
Allowed OAuth Scopes: openid, email, profile
Configure a Cognito Domain (either a custom domain or the default Amazon Cognito domain prefix), for example:
alerta-auth.Copy the generated Client ID and Client Secret.
Add the configuration to the
alertad.confserver configuration:
AUTH_PROVIDER = 'cognito'
AWS_REGION = 'us-east-1'
COGNITO_USER_POOL_ID = 'us-east-1_aBcDeFgHi'
COGNITO_DOMAIN = 'alerta-auth'
OAUTH2_CLIENT_ID = '1abc2def3ghi4jkl5mno6pqr7s'
OAUTH2_CLIENT_SECRET = 'us1-abc123-def456-ghi789'
GitLab OAuth2
To use GitLab as the OAuth2 provider for Alerta, login to GitLab and go to Profile Settings -> Applications -> New Application.
Name: Alerta
Callback URL: http://alerta.example.com
Scopes:
openid
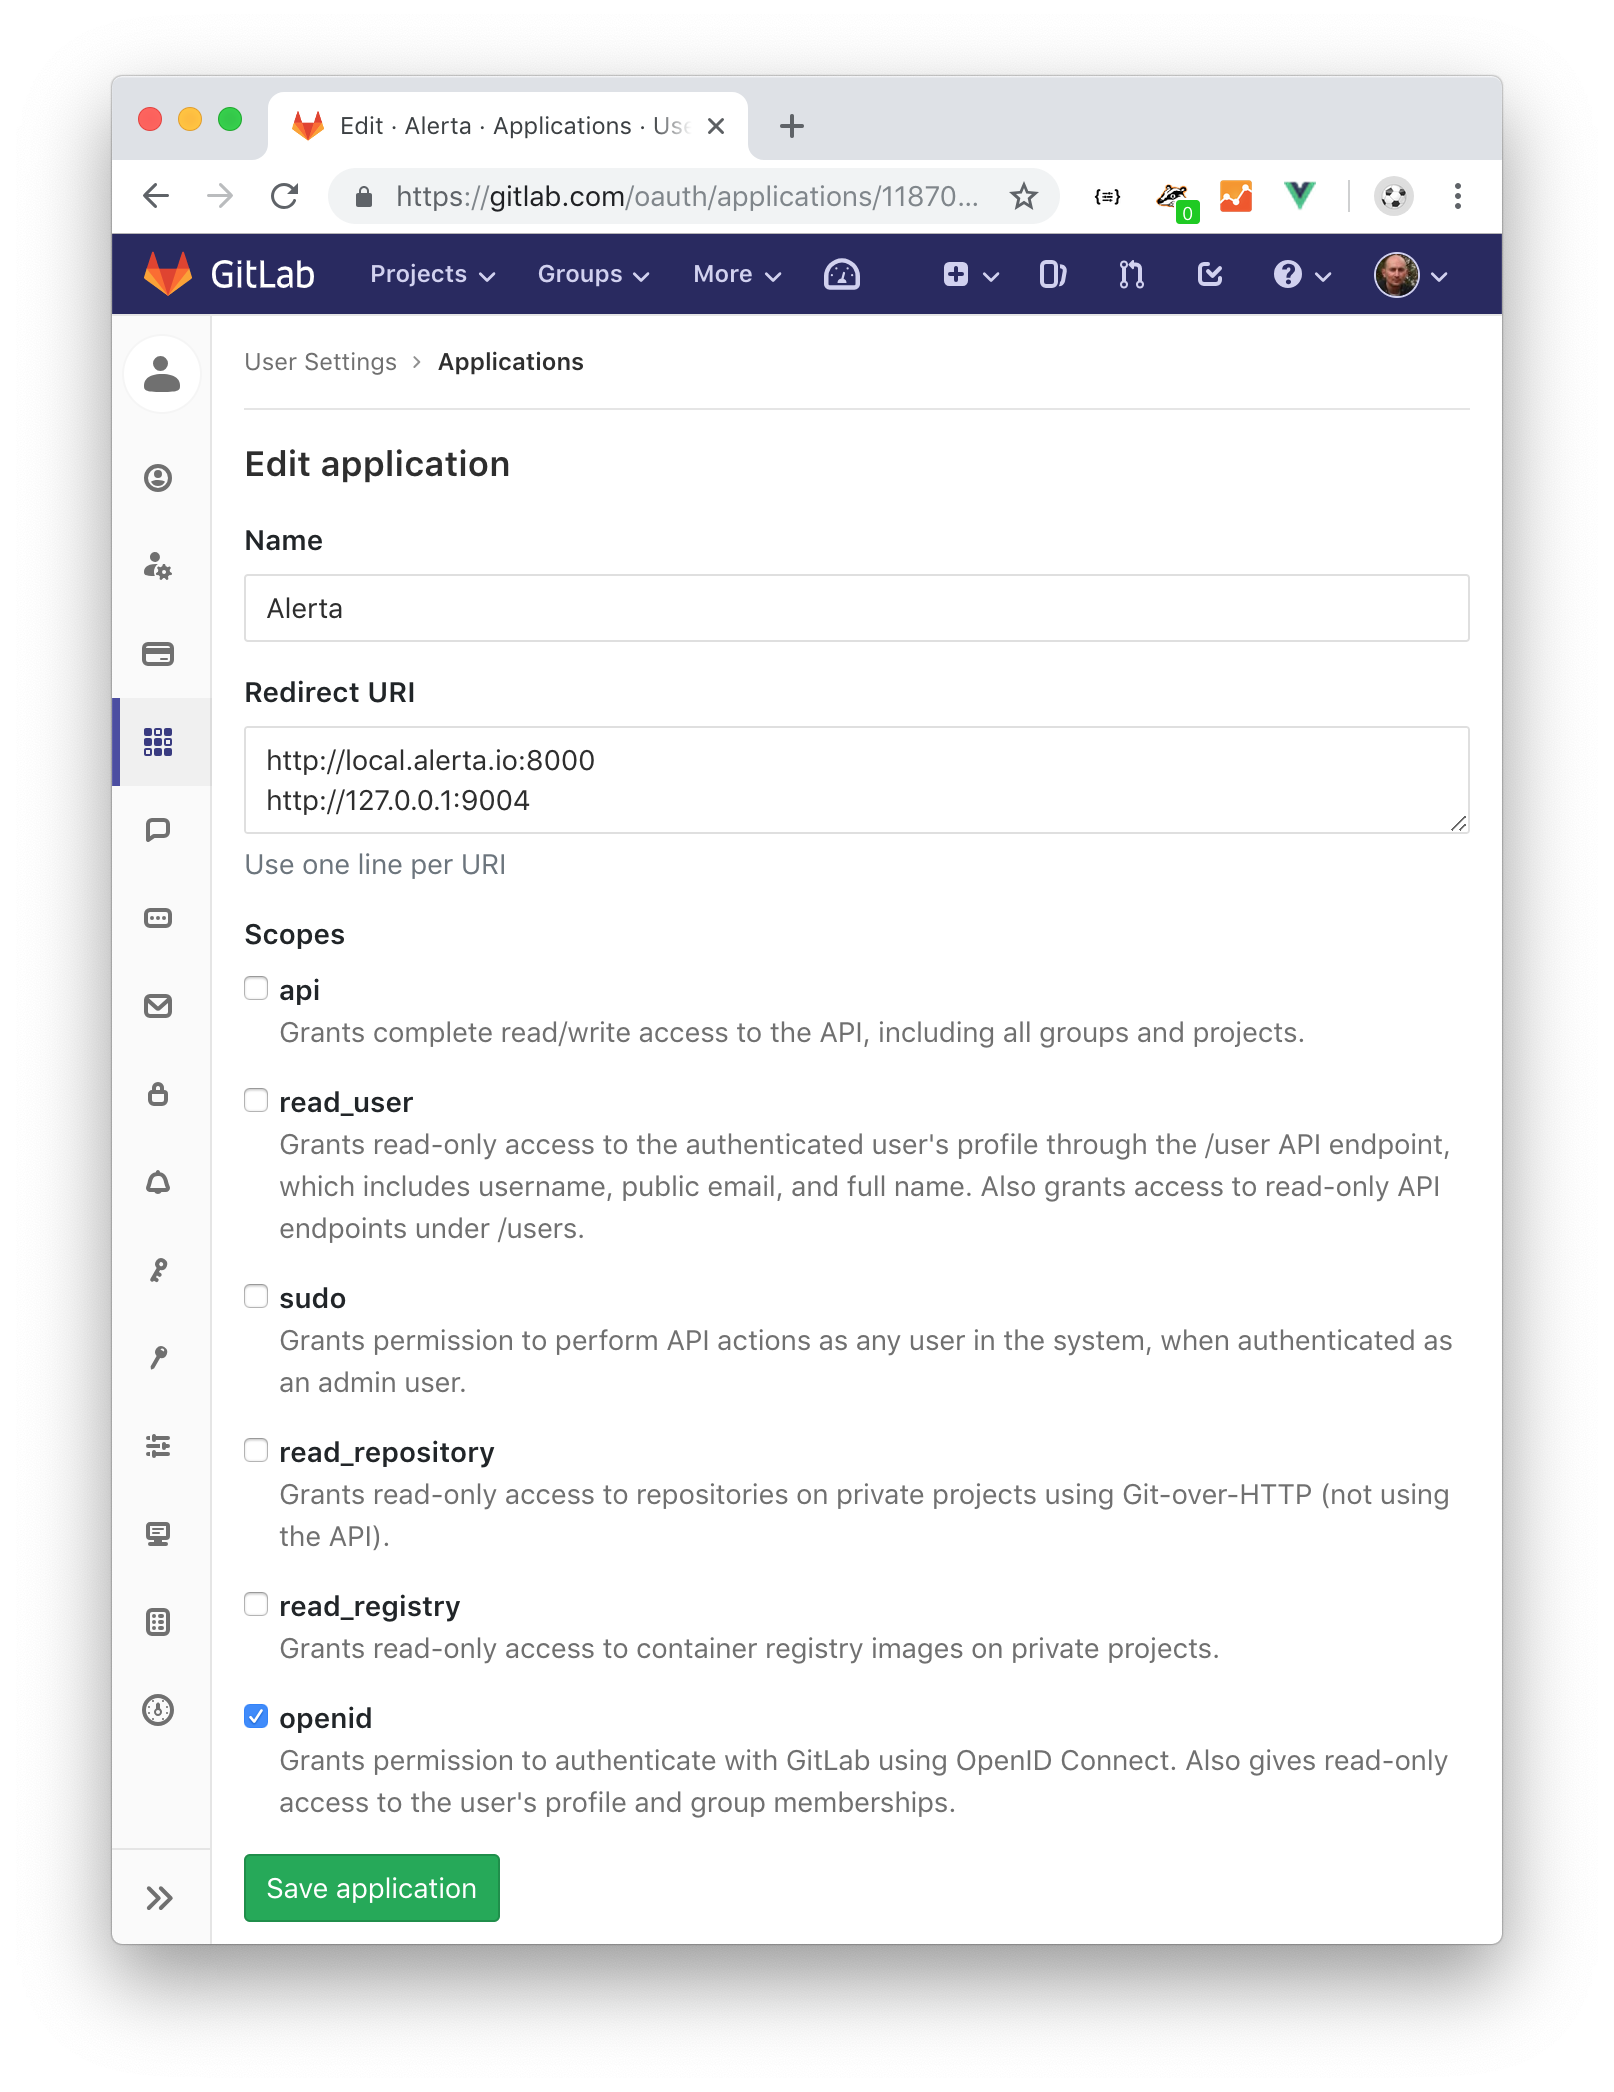
Note
The Callback URL is the most important setting and it is nothing more than the URL domain (ie. without any path) where the alerta Web UI is being hosted.
Click Submit and take note of the Application ID and Secret. Then
configuration settings for alerta server are as follows (replacing
the values shown below with the values generated by GitLab):
AUTH_PROVIDER = 'gitlab'
GITLAB_URL = 'https://gitlab.com'  # or your own GitLab server
OAUTH2_CLIENT_ID = 'd31e9caa131f72901b16d22289c824f423bd5cbf187a11245f402e8b2707d591'
OAUTH2_CLIENT_SECRET = '42f1de369ec706996cadda234986779eeb65c0201a6f286b9751b1f845d62c8a'
To restrict access to users who are members of particular GitLab groups use:
ALLOWED_GITLAB_GROUPS = ['group1', 'group2']
Note
ALLOWED_GITLAB_GROUPS can be an asterisk (*) to force
login but not restrict who can login.
Important
To revoke access of your instance of alerta to your GitLab user info at any time go to Profile Settings -> Applications -> Authorized appliations, find alerta in the list of applications and click the Revoke button.
Google OAuth2
To use Google as the OAuth2 provider for Alerta, login to the Google Developer Console and create a new project for alerta.
Project Name: alerta
Project ID: (automatically assigned)
Next go to APIs & Services and select Credentials from the sidebar menu. Click Create credentials and choose “OAuth client ID” and “Web Application” for application type.
Name: Alerta
Authorized Javscript Origins: http://alerta.example.com
Authorized Redirect URIs: http://alerta.example.com
Click Create and take note of the Client ID and Client
Secret. Use this information to configure the settings for
alerta server.
Example
AUTH_PROVIDER = 'google'
OAUTH2_CLIENT_ID = '379647311730-sj130ru952o3o7ig8u0ts8np2ojivr8d.apps.googleusercontent.com'
OAUTH2_CLIENT_SECRET = '8HrqJhbrYn9oDtaJqExample'
or using ‘openid’:
AUTH_PROVIDER = 'openid'
OIDC_ISSUER_URL = 'https://accounts.google.com'
OAUTH2_CLIENT_ID = '379647311730-sj130ru952o3o7ig8u0ts8np2ojivr8d.apps.googleusercontent.com'
OAUTH2_CLIENT_SECRET = '8HrqJhbrYn9oDtaJqExample'
Deprecated since version 6.6: Google+ API is no longer a requirement.
Warning
It is no longer necessary to enable Google+ API to use Google OAuth. Google+ API will be shutdown on March 7, 2019 and Alerta installations configured to use Google+ API will cease to function after that date.
To restrict access to users with particular Google apps domains use:
ALLOWED_EMAIL_DOMAINS = ['example.org', 'mycompany.com']
Note
ALLOWED_EMAIL_DOMAINS can be an asterisk (*) to force
login but not restrict who can login.
Keycloak OAuth2
To use Keycloak as the OAuth2 provider for Alerta, login to Keycloak admin interface, select the realm and go to Clients -> Create.
Client ID: alerta-ui
Client protocol: openid-connect
Root URL: http://alerta.example.org
After the client is created, edit it and change the following properties:
Access Type: confindential
Add the following mapper under the Mappers tab:
Name: role memberships
Mapper type: User Realm Role
Multivalued: ON
Token Claim Name: roles
Claim JSON type: String
Add to userinfo: ON
Now go to Installation and generate it by selecting ‘Keycloak OIDC JSON’. You should get something like this:
{
  "realm": "master",
  "auth-server-url": "https://keycloak.example.org/auth",
  "ssl-required": "external",
  "resource": "alerta-ui",
  "credentials": {
    "secret": "418bbf31-aef-33d1-a471-322a60276879"
  },
  "use-resource-role-mappings": true
}
Take note of the realm, resource and secret. Then configuration settings for alerta server are as follows (replacing
the values shown below with the values generated by Keycloak):
AUTH_PROVIDER = 'keycloak'
KEYCLOAK_URL = 'https://keycloak.example.org'
KEYCLOAK_REALM = 'master'
OAUTH2_CLIENT_ID = 'alerta-ui'
OAUTH2_CLIENT_SECRET = '418bbf31-aef-33d1-a471-322a60276879'
To restrict access to users who are associated with a particular Keycloak role use:
ALLOWED_KEYCLOAK_ROLES = ['role1', 'role2']
Note
ALLOWED_KEYCLOAK_ROLES can be an asterisk (*) to force
login but not restrict who can login.
Note
When using self-hosted authentication providers, such as Keycloak,
it may be necessary to set the REQUESTS_CA_BUNDLE environment
variable, supported by the Python requests package, to the self-issued
CA bundle to avoid SSL verification issues.
CAS
Central Authentication Service (CAS) is a single sign-on protocol for the web.
To use CAS as the authentication provider for Alerta, set the AUTH_PROVIDER
to cas and configure the CAS server URL.
Example
AUTH_PROVIDER = 'cas'
CAS_SERVER = 'https://cas.example.com'
CAS_VALIDATE_ROUTE = '/serviceValidate'
The CAS provider supports both JSON and XML response formats. By default, it
will try JSON first and fall back to XML (CAS_RESPONSE_TYPE = 'AUTO').
Role and group information can be extracted from CAS attributes using the
CAS_ROLE_CLAIM and CAS_GROUP_CLAIM settings:
CAS_ROLE_CLAIM = 'roles'
CAS_GROUP_CLAIM = 'groups'
API Keys
If authentication is enforced, then an API key is needed to access the alerta API programatically. An API key can also be to used by the alerta CLI for when the CLI is used in scripts. See the example CLI config for how to set the API key for the command-line tool.
Keys can be easily generated from the Alerta web UI and can have any scopes
associated with them. They are valid for 1 year by default but this period
is configurable using API_KEY_EXPIRE_DAYS in the
server configuration.
To use an API key in an API query you must put the key in either an HTTP header or a query parameter.
Important
Using an HTTP header is the preferred method so that API keys are not exposed even when using HTTPS or inadvertently captured in log files.
Example using HTTP header
Use either the Authorization header with authorization type of Key:
$ curl 'http://api.alerta.io/alerts' -H 'Authorization: Key demo-key' -H 'Accept: application/json'
or the custom header X-API-Key:
$ curl 'http://api.alerta.io/alerts' -H 'X-API-Key: demo-key' -H 'Accept: application/json'
Example using query paramter
Use the api-key URL parameter:
$ curl 'http://api.alerta.io/alerts?api-key=demo-key' -H 'Accept: application/json'
HMAC Auth
HMAC authentication provides a secure method for machine-to-machine communication with the Alerta API. Instead of using static API keys, HMAC uses a shared secret to sign each request, ensuring both authenticity and integrity.
To configure HMAC authentication, add one or more credentials to the
alertad.conf server configuration:
HMAC_AUTH_CREDENTIALS = [
    {
        'key': 'a1b2c3d4-e5f6-7890-abcd-ef1234567890',  # access key ID
        'secret': 'MWYyZDdjMzg3ZjRjNTExZWM4NjNkYzYw',  # secret key (base64)
        'algorithm': 'sha256'  # valid: sha256, sha384, sha512
    }
]
The key is sent as a header to identify the caller, while the
secret is used to compute the HMAC signature of the request. The
server verifies the signature against the stored secret for the given
key, rejecting requests with invalid or missing signatures.